You can then access any public properties on the class that are exposed with attr_accessible or by using a custom getter and setter. If you have not specified any properties for your instance variables you can use the instance_variable_get helper to access the internal instance variables.
Using Internet SIP trunking services with a VOIP phone system is incredibly cost effective. The only problem is the unreliability of the Internet. We’ve been expreimenting with several tools for monitoring phone call quality but VoipMonitor has been the most useful. Some of the most useful features are:
Creates packet capture of each phone call. This is really useful because you get more manageable capture files, not one monster files containing all calls.
It logs all calls to a MySQL database and calculates several important metrics like MOS. If you need an example of a bad quality call to send to your provider you can just sort the call table by MOS. Anything under 4.0 probably has some jitter or lag in the audio.
Here are the steps to install VoipMonitor (these are just slightly modified from http://www.voipmonitor.org/):
Install libpcap. You need a version > 1.0 so the version in the yum repo is not current enough.
wget http://www.tcpdump.org/release/libpcap-1.1.1.tar.gz
tar xzf libpcap-1.1.1.tar.gz
cd libpcap*
./configure
make
make install
Install the mysql client that VoipMonitor uses to connect to MySQL
wget http://tangentsoft.net/mysql++/releases/mysql++-3.0.9.tar.gz
tar xzf mysql++-3.0.9.tar.gz
cd mysql++-3.0.9
./configure
make install
ldconfig
cp /usr/local/lib/libmysqlpp.so.3 /usr/lib/
Install VoipMonitor
wget http://dl.nvthost.com/downloads/voipmonitor-3.0.1.tar.gz
tar zxf voipmonitor-2.0.tar.gz
cd ../voipmonitor-2.0
make
make install
cp /usr/local/lib/libpcap.* /usr/lib
Next you need to create the MySQL database. Here we use the mysql command line client. You can also use phpMyAdmin or Webmin if you have access to it.
We always specify a MySQL root user password during the installation of Trixbox and Elastix so we just log in as the root user. Use mysql -u root and then you will be prompted for a password.
mysql
     mysql> create database voipmonitor;
     mysql> exit
Create the database tables.
cat cdrtable.sql | mysql voipmonitor
Start up VoipMonitor. The u and p switches are for the MySQL username and password. Call VoipMonitor with no arguments to see a list of possible command line switches.
My DSL connection has been getting slow and slower over the past year. It was so slow at one point that I went out and bought a Clearwire modem and set up my router to load balance between the two. I would have switched to Clear completely but their modem (actually a full router) is not able to pass along its public IP address to use on a seperate router. This caused VPN connection issues to work.
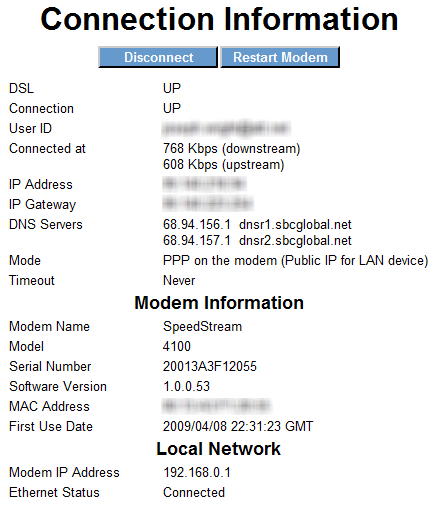
When looking at my DSL modem connection information it appears that i’m only connecting at 768Kbps despite paying for 6Mb service.
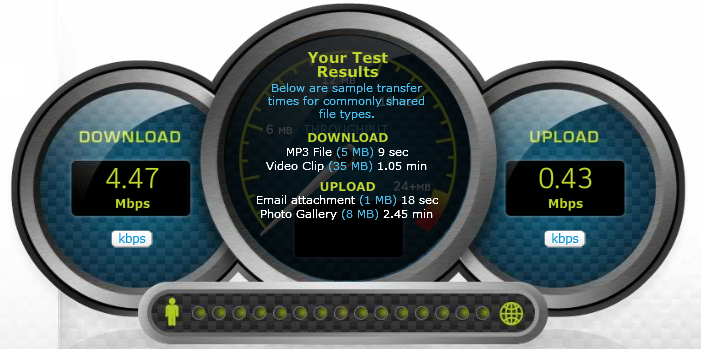
This is definitely a problem that AT&T needs to fix. I started looking for a support phone number on their website and ended up in some kind of connection troubleshooter. One step was to run a speedtest on the AT&T website (http://www.att.com/speedtest/). The results were astonishing. Even though my modem was only connected at 768Kbps, I was getting almost 5Mbps download speed.
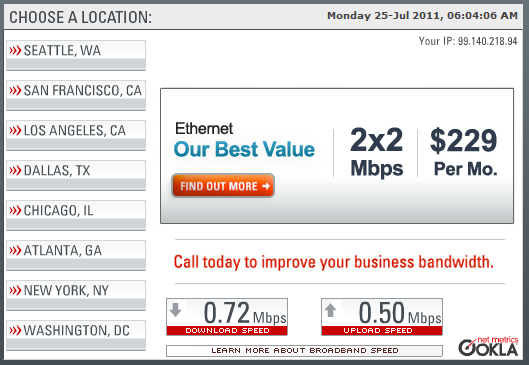
A speakeasy speedtest returned the results that I was expecting.
Is AT&T trying to scam consumers by telling them that the internet speeds they’re receiving are actually much faster than they are?
We have recently begun installing a lot of Exchange 2007 servers, both Exchange 2007 standard and as part of SBS 2008. Starting with Exchange 2003 there is a lot of reliance on the web services part of the server which reside in IIS. In order to get things working properly we get a SSL certificate, usually from GoDaddy, to secure the exchange directories. This allows us to set up devices with Exchange Activesync, OWA without certificate warnings, and Outlook Anywhere.
We’ve noticed that when installing these certificates, Outlook clients on the domain begin to see a certificate error. This is because of the Autodiscover URLs that are part of Exchange server and the fact they no longer match the self-signed certificate that Exchange produces on installation.
In order to update those URLs you need to use Exchange Management Shell to run some commands. The commands are different for SBS installations and Standard installations. In the following commands, replace yourserver with the netbios name of your Exchange server and external.yourdomain.com with the external address of your server.
For SBS 2008 run the following commands in Exchange Management Shell:
Set-WebServicesVirtualDirectory -Identity “yourserver\EWS (Default Web Site)” -InternalUrl https://external.yourdomain.com/ews/exchange.asmx
Set-OABVirtualDirectory -Identity “yourserver\oab (Default Web Site)” -InternalUrl https://external.yourdomain.com/oab
Set-UMVirtualDirectory -Identity “yourserver\unifiedmessaging (Default Web Site)” -InternalUrl https://external.yourdomain.com/unifiedmessaging/service.asmx
If you’re not sure which set of commands to use, type Get-WebServicesVirtualDirectory in Exchange Management Shell and see what is listed for name. You will either see EWS (SBS Web Applications) or EWS (Default Web Site). Match that up with the command set above and it should find the appropriate virtual directories.
On Windows Server 2008, if you see access denied errors then make sure you use Run As Administrator to run Exchange Management Shell.
At this point, we have solved problems with Autodiscover that resulted in error messages in Outlook clients but have not actually set up Autodiscover. The Autodiscover setup process usually includes setting up a new site in IIS for autodiscover.yourdomain.com and adding the autodiscover virtual directory to it. You’ll also need a SSL cert for it which is why we don’t usually set it up. We have yet to see any advantages to setting up Autodiscover since our clients usually don’t have that many clients connected to their Exchange server.
VMWare Fusion 3 was just released today. I was hesitant to upgrade at first because I didn’t know there was upgrade pricing. As soon as I saw I could upgrade for $39.99 I did.
After playing around with it for a while I don’t see many new features that I’ll actually use. I have been running Windows 7 for a few months now without the Aero interface and I think I prefer it that way. I use Windows 7 on my Mac as a Visual Studio development environment so I want to keep it fast. Enabling Aero seems to have slowed everything down. Windows seems less snappy than it was.
I also think that enabling Aero makes the CPU and graphics processor work harder than before. When I start up 7 I can hear the fans in the MacBook Pro kick on to full blast and stay on for about 10 minutes until the laptop finally cools down.
The one feature I will be looking forward to are the automatic updates. Hopefully no more uninstalling the entire app and then re-installing for every upgrade. They also integrated a virtual machine library like they’ve had on their site for a while which makes it easy to try and utilize open source and trial software that has been bundled as a VM.
I’m glad I upgraded to the newest version but I don’t think I’ll take advantage of any new features. I’m sure there are a lot of performance enhancements and bug fixes in the background that will make this a valuable purchase but I didn’t have many issues with v2.
So, on Friday (10/23) I headed to the apple store on Michigan Avenue in Chicago to pick up a new 27-inch iMac. I like being an early adopter so I knew I wanted it as soon as it was announced. As soon as I bought it, I hopped in a cab to take it home. The packaging is pretty slim like all Apple products but since the computer itself is big and heavy, the box is big and heavy.
At home, I connected it to my wireless network and everything was working smoothely. I installed all software updates along with some additional software. Then, suddenly, I had to internet access. I checked my list of wireless networks and it wasn’t showing any. I restarted the computer and they all came back and I was immediately connected to my home network.
Then it happened again. I called Apple tech support and they had me boot up to the Snow Leopard DVD to test the wireless card and then reinstall all of Snow Leopard. The problems seems to occur when lots of data is being transmitted wirelessly such was when using Skype or watching videos on Hulu.
Apple tech support keeps insisting I restart my router and change my router’s security. Apparently telling them that no wireless networks at all show up even though I live in a condo in downtown Chicago doesn’t mean anything to them. Tech support set me up with a Genius Bar appointment with my brand new iMac so we’ll see how that goes. I’ll keep this post updated as I learn more about the tech support process at Apple.
Update: Apple just replaced the iMac after showing the person helping us at the genius bar what was going on. It would not show any wireless networks and also crashed twice.
Update: The new one we got has dust behind the screen. We’re going to pick up a new one tonight.
I recently purchased the Linksys Powerline Network Kit (PLTK300) to bring a network jack into my family room. The purpose of this was to provide an ethernet connection to my Samsung Blu-ray player with Netflix capabilities. Since I live in a condo building I was a little bit skeptical of this working. I knew that I have my own circuit breaker in my unit so at least there was a single point of convergence for all my electrical outlets that was close.
The kit works right out of the box. You simply plug the module with the single ethernet port into your current network and into the wall. Then plug in the four port device where ever you need a network connection. Both devices come programmed with a network password so they will see each other immediately, along with any other devices with the default network password on your electrical network.
In order to change the network password you need to install the Powerline Utility from the CD in the box or by downloading it from the Linksys website. The utility lets you see the status of the connection and also set network passwords and run diagnostics. To make any changes to the remote powerline device, you need to enter its password into the utility. The password is on the bottom of the device. If you have more than one device, you will have to enter the password for each one. The Powerline utility will save the passwords in order to make changes to all the devices at once.
I would recommend changing the network password immediately, especially if you live in a multi-tenant building. The devices with the same default network password will bridge your wired network together. Currently I don’t see any other devices in my building but also remember questioning wireless security when setting up my first wireless access point.
The setup works very well. I’m now able to stream Netflix movies to my Blu-ray player very quickly and without any of the consistency issues you see with wireless. I also plan on connecting my Tivo using a usb ethernet adapter soon to speed up the process when renting movies from Amazon. Currently I use an old Linksys 802.11b wireless adapter since it was one of the only ones Tivo supported at the time.
The only problem I ran into during the setup was that I was initially getting very poor speeds, somewhere around 8Mb. I didn’t follow the instructions to plug the device directly into the wall because I didn’t have any outlets immediately available. Once I had both ends plugged into the wall the speed immediately increased to around 70Mb. These were just standard surge protectors too, not a ups or anything like that. Make sure you plug these right into the wall to get maximum speeds.